Monday, February 26, 2018

Jasper gets a new collar


In my search to sew down the stash, I wanted to use as much from the hoard as possible.
The body was from thrifted yardage of very squishy, heavy cotton track suit velour, in a lovely navy blue.
The collar lining is an old pal.
Going to have to piece this together

but I have enough!

I'm down to the scraps of this brushed Joann's poly.

you can see that central fold line. Yes, I folded and THEN I traced the half piece. HA.
Most PDF patterns have folded pattern pieces to make the printing less onerous.
I traced them to make full pattern pieces and lay this out in a single layer for cutting. The big fold lumps (aka:turn of cloth)on a heavy fabric screw up seam matching.

The suggested fabric is sweatshirt or terry knit, and while velour is bulky, it's not very stiff.
The collar crosses over, and the intention is for it to stand up. 
You could make it do this, a layer of interfacing would do the trick nicely, but I elected not to pursue that issue.
The only tricksy part ended up in handling the collar.

In sewing the pieces together and top stitching, it stretched out along that seam, making the whole assembly curve out and down, rather than up slightly.

So I trimmed it up. Making the crossover part slightly smaller.


 My alterations were the usual: I shortened the body an inch, scaled the lower band to make it 1/2" (1" overall) narrower. Cause I'm 5'2" and Lisa's model is 5'7". 
Once I figured that out, it was smooth sailing.

Someday I will improve on my modeling skills. I'll get right on it.
Ah, the bathroom selfie. There is no good lighting in my house. And this is a dark light absorbing fabric.


overexposed to show....collar
Okay, I crossed the collar the wrong way....
I call it a win. It's pretty and cozy.
And, as ever, I don't get paid for this. I got paid in cozy!

Sunday, February 25, 2018

Wrap dressing continued: the infinity dress

I never made one of these, they are still all over pinterest. I only searched this out because I noticed that  it's the dress for all the bridesmaids in this wedding video

https://youtu.be/KgZ4ZTTfKO8

and who says musical comedy has no place in the every day world?

 If you search on infinity dress on Pinterest, there are a billionity ways to tie this sucker. And until the fabric dies, it's all good.


simplicity 1154
Five yards for the full length,  3 1/4 for knee length


Ten more than the other? Ten better?
It has a youtube video too.

This is the chiffon/challis wrap skirt/dress. For your lightweight wovens (so they don't feel left out).

So you want to make your own? Best instructions so far are from
http://knucklesalad.com/convertible-infinity-dress-how-it-almost-defeated-me-and-what-you-need-to-make-one/
(that whole security http vs https prevents me putting a real link there. Poo) Copy/paste/browser. You know how to do this.

I watermarked all over it so you'll go to her page and get the real deets. She nailed it just for you. 


Essentially pants with the same wrappy bodice

I'm working on things that are not working out, and will 'wrap' them up in a week or so.

 Sadly, one of them was going to be my cosplay for Emerald City Comic Con on Friday.
The other is/was a hat to wear to SewExpo on Thursday.
Now I have to figure something else out.

To feel like I had accomplished something, I spent the whole afternoon changing the green thread to red on the logo.

https://www.zazzle.com/erniek_power_tool_coffee_mug-168697362251233940
I had the cat on my lap. I was trapped.

Sunday, February 18, 2018

Coat assembly instructions


Sewing a coat is like sewing a car. It has a lot of parts and an order to assemble them in.
Every time I've sewn one, I've made a list of the tasks, the parts, and used my time to arrange them in the order I need them to get done in.
I am parking this list here for my future benefit.
There is one highlighted activity in the middle that came up this week. 
Oh, you'll see it right away.


The raincoat has a sleeve and upper body overlay as well as the main body piece, pockets that were internal and outside welt pockets. And it's fully lined. This made it complicated in ways that the winter coat is not.
Nevertheless, much of the same process applies.
So, for your entertainment, and an explication of how you can take a complicated task and break it down into a long list of five minute activities
(or: what I learned I could do during a child's nap time, when I had napping children), here's the list. 


Raincoat 2017 assembly instructions
Materials:
  Things that need sealing:
  Upper front shoulder seams
  Hood seams
  Collar seams
  Welt pocket seam
  There is so much fabric at the placket and overlays, I don’t think that needs sealing
Order and name of Layers:
  Outer: upper body overlay, main body
  lining: main body
  mesh for upper body overlay
Zippers
  One long center zip with placket/flap to cover/underlie (zip flap opens to right hand)
  Two shorter coil zippers on lower side seams to close in windy weather

  Two Interior pocket zippers

  Anorak snaps for placket
Seam tape for inner zipper finish, collar, side zips. Grosgrain, whatevers….
ASSEMBLY
Assemble fronts
Stay stitch neck seams all pieces
  Baste front/back linings together at shoulder seam and mark for pocket locations, adjust fit. Remove basting stitches.
  Sew Welt pocket through outer fabric (outer) to oversize lining pocket rectangle (both sides). Seam seal, let dry.
  Sew inside pocket to lining at chest height (both sides) and add zippers to tops to close.
     --finish ends of zippers so they don't uncoil and snag clothes
I'm not showing you the snagged sweater, but there were some tears. I'm adding some ribbon over the ends. The coil wants to uncoil. It wants to be free.
Nice little fishhook it is.

Happened on both sides of both pockets

  Finish outer pocket, wondertape to outer fabric to secure.
  Sew outer front to back at shoulders,check pieces to line up at center – ZIPPER BASTE?
  finish shoulder seams = ‘body’
  Sew front to back mesh at shoulders, finish seam
  Attach mesh to lining, finish seam
Assemble upper fronts
  Stitch upper fronts together at shoulder seam, sew outer hood,
 seal both and let dry
  Hem 1” leave side seam ends open. Do not finish cuffs. Be careful about matching hem position at center seam
  Baste upper fronts/outer hood at collar seam. Adjust for fit. Stitch, seam seal, let dry
Hood assembly

  Sew hood lining, stitch seams open.
  Baste stiffening material at center brim section (horsehair trim?)

Final body assembly
Sew all side seams, checking upper hems to match
Sew Short zipper to outer fabric (with end join at side seam), fold under lining to cover zip tape on inside
Baste outer fronts and backs to lining Check and stitch
Sew lining  hood to lining. Check with outer hood assembly to match. Flatten collar seam.

Sew hood and lining to outer hood at front hood edge. Turn and topstitch
Cuffs? Turn later? Check for length and turn later?
Secure layers together at center seam. Leave it open to add zipper?
Big outer pocket will need tacking to lining for support.

Zipper placket
Placket will get a couple snaps to close quickly (two at hood part)
Mark zipper both sides with thread at hood collar seam intersection
Baste zipper and unfolded flap to front finished upper/front/lining .
Order is front, then flap wrong face to right face of front, then zipper on top: stitch together, leave a lot of zipper tape open.
Yes, I made myself a diagram because I knew I would forget. And no, I haven't put the zipper in the raincoat yet. Fall Raincoat season blew by in a week. Now it's winter. Don't worry: there will be a Spring raincoat season. A long one.

  Fold flap  and zipper out, fingerpress and stitch to secure front
  Fold flap over zipper to cover, then back and  turn under to seam.

Finish cuffs with fold and topstitching

Trim flaps to match sides

And this is what I think about when I go to sleep at night. It's boring enough to put me to sleep, thinking I've done my duty and can sleep well.
And since I've put it here on the blog, I will be able to find it again.

Sunday, February 11, 2018

Double Welt Pockets and Coats

When you put an exterior pocket in a raincoat, you make a rectangular hole in the part that keeps you dry.
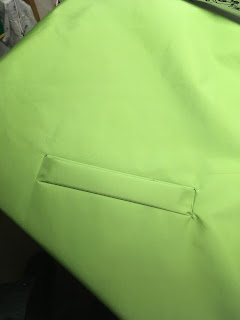
This is a double welt pocket. Peeking!
Helly Hansen rubber raincoat double welt pocket outside. 
The extra outside flap covers the normally directional inside flap, 
making a double door for your hand to go through, preventing water from pouring in.
Also keeps stuff from falling out.

And now that Seattle has downpours more than it has drizzle, staying dry is a key element to consider.

I love that red Helly Hansen jacket. I wore the first one out.

In making a new coat, I stole the pocket idea from the old.
The disembodied hand in a phantom pocket. Or, it's going in and down.
I measured my hand for size of welt. Six inches is not big enough for model hand.
The pocket bag is very big. It got smaller but if I needed to shoplift a couple of goats to go with the cow, I'd need all the pocketry I can get.
Now, it is important to mention that like handbags, the increased size of the container means you will try to carry more stuff. People hand you stuff.
I don't want a bottomless pit. I want to make sure I can touch the bottom of the pocket without leaning into it.
Essentially, I pinned the pattern to me, and put my hand where I expected the pocket to open and how long my arm reached. And that's where I marked the pocket location and it's depth.

G is for green material. Or go. And this is not a double welt pattern. 
Miyake patterns have a billion self welt pockets, it's how I learned to make them.
Since this was going to be a double, I needed to make a paper one to play with
Seven and a half inches opening width. BIG model hand with a wallet in it's grasp. We forget about that aspect, the holding and insertion and removal. 
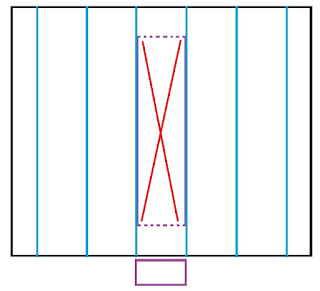
The red X is the opening. The folds are TWICE the width of the opening (that purple rectangle is the width measurement), plus a touch more for turn of cloth. You can always fudge it back, but it's hard to make the folds cover each other if they aren't wide enough.
Those skinny little grey lines in the flaps represent where the interfacing should have gone. They are grey for failure.

Nevertheless, the great thing about tracing paper is you can see previous lines and trace over them or ignore them, as you need or not need. Grammar much? Anyway, I made a model on the lines I drew on the front pattern piece, goofed around with it,  drew it out and trued it up on the grid board.

Yes, the pocket bag is huge. And it needed an extension to the welt facing to attach the other side of the pocket, thus that longish rectangle with the letters on the side. 
Sewed it down on the long edges of the opening. Not the ends. That happens shortly.

Cut it open

Cut the long triangles
Flipped it inside out and poked those triangles through and folded it up.
This is where the extra flap direction needed attention and a good night's sleep.
It is sewing a car.

Sewed those triangles to the facing to keep the whole little welt accordion together

The welt will stay puffy. I didn't want to punch more holes in it by topstitching, and I did not (IDIOT !) put two sided tape in the folds to keep it. The fabric will not hold a press. This was a mistake, don't do that, put interfacing and doublesided tape in your pocket welts in your raincoats. These are mushy welts. They should be crispy.
And perfect is the enemy of wearing this coat in the season it was intended for.
Now this is where things get fun. This enormous interior pocket is only attached at the welt, and it is going to get heavy stuff put in it. My hands for a couple, probably a phone a wallet whatever junk someone hands me to carry.....
it needs support.
I cut an athletic non stretch mesh piece for each front piece, sewed the top of the pocket to it and attached it at the top seam on the shoulder and the collar. The shoulder will do the heavy lifting as usual.
Yes, that's a chunk of teal colored plastic bendable cutting board from the kitchen. Yes Threads paid me $25 for that hint a few years ago. I can say they are very very useful for working between layers. Irons melt them.
Don't iron them.

And hung inside out on M'damn, there it is.

Winter came back this week. I would like to report that in addition to it's great capacity for cow lifting, I can wear an entire down parka under this coat and have room to spare. And it is very waterproof (so much so that rain drips down and hits the backs of my legs. Hint to self: make the coat hem lean out, not curve in). 

Sunday, February 4, 2018

2017/18 Winter Coat That Is Not Black

all these photos get big when you click on them. And there are a lot of them.
So this is as far as the coat got last spring. The body and the hood spent the summer and the fall hanging on the rack.
The pattern pieces......they went somewhere else.
This was THE COAT MATERIAL until I realized it would just shred with wear. Sure, I would be the most beautiful golden thing for a week.
But no.
 And yes, I still hang the pieces so they won't wrinkle.


I trimmed the seam allowances of the quilted lining, but I did not try it on and check the fit. And kids, this is where it goes off the rails for real.
I could not find the pattern pieces, so I traced the coat lining. 
Which went wide.


Little patchable edges went off the edges, but it all fit onto two yards of two layer supplex. 
From the STASH, kids. From the stash!
Internal pocket zippers got a Shoe Goo bead as end stops.


I sewed the patch pockets onto the  lining


Mmm, go mug fits just right!


Stole the pocket design from my Helly Hansen monsoon jacket


Yes, this is how instructions work.


Made a model of the double welt piece, folded it up to verify.

I marked the coat front where my hand landed to go into the pocket.
Apparently not noticing SIZE.


Yes, I had scraps. I used them all up.


From the still unfinished raincoat (also last spring) hiding out back there


Seam sealing the hood with Fabric Fusion glue


Useful weights.
Pinned together at the seam allowances...why didn't I try this on NOW???????

I flipped it partially inside out so I could stitch the lining and the outer fabric together at the hood/body seam, sewing through the seam allowances.

Which gets really awkward because I had already sewn the hem.
It worked far better than it should, frankly.

At this point, I had the zipper fail vision, and unpicked and redid it.
Marginally better, but I know I tried.
Still haven't really tried it on  to check how it looks.

I pieced together cuffs from  the leftover bits


Put elastic in them, put more of that sweet Pac Fabs ribbon to cover the transition.

I learned a lot sewing this. I put a lot of hard, good work into it. I have a lot more photos of this process, and I am happy with 95% of what I did. 

Unzipped.Yes, that's the redone zipper. It was worse.
And we're just going with this collage.
I am not a small person (well, I am short, but I'm chubby) but I am not that wide.
There's three inches too much overlap on the front placket.
Thus the cringy face here.
I can shoplift a cow.
A 26" zipper is two inches too long for me to connect and close without awkward efforts.

Kids, I added some snaps and I wear it.
Because that purple coat died.
And I am my own traffic flag. 
The pockets are great. That hood is rocking it (keeps the rain out of my face and I can see from side to side. It's waterproof (and man, did I need that this week!) and windproof (ditto). 
And I will not shoplift a cow.

And when summer rolls around, I will take this apart AGAIN and rethink it. Or send it to the thrift shop and make another.

Because except for the zipper, this is ALL from the stash.
So disregarding the 'my wife is an avocado' jokes from my metrostylin spouse, I am pretty happy with this.
About 92% there.